Saturday 15 December 2018

Auto check for update function for android app | android studio

If you are having an app on Google Play Store and you want that whenever you update the app on playstore and when the user opens the older version of app he/she will get a dialog that there is an Update available .
Each time the user will open the app he/she will get the same dialog until he/she updates the app.

Advantages:

This will inform the user as a notice that there is an update.

Users will have the latest version of app.
Automatically checks for update in the background.
There is also an option for mannual check and automatic check.


How to use:

Step-I
I have already create a class(AppUpdateChecker.java) to achieve this feature that will handle it automatically.

AppUpdateChecker.java
 
 package com.programmingdesire;  
 import android.app.Activity;  
 import android.app.ProgressDialog;  
 import android.content.DialogInterface;  
 import android.content.Intent;  
 import android.content.pm.PackageInfo;  
 import android.content.pm.PackageManager;  
 import android.net.Uri;  
 import android.os.AsyncTask;  
 import android.support.v7.app.AlertDialog;  
 import android.widget.Toast;  
 import org.jsoup.Jsoup;  
 public class AppUpdateChecker {  
   private Activity activity;  
   public AppUpdateChecker(Activity activity) {  
     this.activity = activity;  
   }  
   //current version of app installed in the device  
   private String getCurrentVersion(){  
     PackageManager pm = activity.getPackageManager();  
     PackageInfo pInfo = null;  
     try {  
       pInfo = pm.getPackageInfo(activity.getPackageName(),0);  
     } catch (PackageManager.NameNotFoundException e1) {  
       e1.printStackTrace();  
     }  
     return pInfo.versionName;  
   }  
   private class GetLatestVersion extends AsyncTask<String, String, String> {  
     private String latestVersion;  
     private ProgressDialog progressDialog;  
     private boolean manualCheck;  
     GetLatestVersion(boolean manualCheck) {  
       this.manualCheck = manualCheck;  
     }  
     @Override  
     protected void onPostExecute(String s) {  
       super.onPostExecute(s);  
       if (manualCheck)  
       {  
         if (progressDialog!=null)  
         {  
           if (progressDialog.isShowing())  
           {  
             progressDialog.dismiss();  
           }  
         }  
       }  
       String currentVersion = getCurrentVersion();  
       //If the versions are not the same  
       if(!currentVersion.equals(latestVersion)&&latestVersion!=null){  
         final AlertDialog.Builder builder = new AlertDialog.Builder(activity);  
         builder.setTitle("An Update is Available");  
         builder.setMessage("Its better to update now");  
         builder.setPositiveButton("Update", new DialogInterface.OnClickListener() {  
           @Override  
           public void onClick(DialogInterface dialog, int which) {  
             //Click button action  
             activity.startActivity(new Intent(Intent.ACTION_VIEW, Uri.parse("market://details?id="+activity.getPackageName())));  
             dialog.dismiss();  
           }  
         });  
         builder.setNegativeButton("Cancel", new DialogInterface.OnClickListener() {  
           @Override  
           public void onClick(DialogInterface dialog, int which) {  
             //Cancel button action  
           }  
         });  
         builder.setCancelable(false);  
         builder.show();  
       }else {  
         if (manualCheck) {  
           Toast.makeText(activity, "No Update Available", Toast.LENGTH_SHORT).show();  
         }  
       }  
     }  
     @Override  
     protected void onPreExecute() {  
       super.onPreExecute();  
       if (manualCheck) {  
         progressDialog=new ProgressDialog(activity);  
         progressDialog.setMessage("Checking For Update.....");  
         progressDialog.setCancelable(false);  
         progressDialog.show();  
       }  
     }  
     @Override  
     protected String doInBackground(String... params) {  
       try {  
         //It retrieves the latest version by scraping the content of current version from play store at runtime  
         latestVersion = Jsoup.connect("https://play.google.com/store/apps/details?id=" + activity.getPackageName() + "&hl=it")  
             .timeout(30000)  
             .userAgent("Mozilla/5.0 (Windows; U; WindowsNT 5.1; en-US; rv1.8.1.6) Gecko/20070725 Firefox/2.0.0.6")  
             .referrer("http://www.google.com")  
             .get()  
             .select(".hAyfc .htlgb")  
             .get(7)  
             .ownText();  
         return latestVersion;  
       } catch (Exception e) {  
         return latestVersion;  
       }  
     }  
   }  
   public void checkForUpdate(boolean manualCheck)  
   {  
     new GetLatestVersion(manualCheck).execute();  
   }  
 }  

Step-II
Add a library to your build.gradle(App level) file.

   implementation 'org.jsoup:jsoup:1.10.2'  

Step-III
The last step is to copy that class and then write two lines of code.


 AppUpdateChecker appUpdateChecker=new AppUpdateChecker(this);  //pass the activity in constructure
 appUpdateChecker.checkForUpdate(false); //mannual check false here

Lets understand what is manual check

If manual check is true then
Manual check will be on a button click this will show the dialog as "Checking for update"


If manual  check is false then
Checking for update will be performed in the background and finally a dialog will be visible if there is any update.


If user will click on update it will open your app in playstore to update your app.

Thats all.

Thanks for visiting, I will come with new code snippet.
Happy Coding.......


Save Your Friends Status - WhatsApp Status Saver App

Love your friend's status ? Hesitate to ask? you are on the right page.

Its been easy to grab the whatsapp status of your whatsapp contacts.

So here are the steps to save or share the status (Image or Video) of whatsApp.

1. Install  WhatsApp Status Saver App by ProgrammingDesire.com in your phone.


2. Open whatsApp and watch some status.

3.Come back to Status Saver and you will find the status there to download and share.


Directly open whatsapp from status saver . 


You can save status to your internal storage. 


You can directly share the status to whatsApp or any other social medial very easily by clicking on the share button. 

Now Enjoy the life with pride.


Sunday 9 December 2018

How to insert images in C/ C++ using graphics(100% working)

Hello friends today we will learn how to insert images in  C++ language very easily using graphics. The things that are required for this work are listed here .....

1.Code blocks compiler installed on your system:

Code::Blocks is a freeopen-source cross-platform IDE that supports multiple compilers including GCCClang and Visual C++. It is developed in C++ using wxWidgets as the GUI toolkit. Using a plugin architecture, its capabilities and features are defined by the provided plugins. Currently, Code::Blocks is oriented towards CC++, and Fortran. It has a custom build system and optional Make support.(by wikipedia).

2.Graphics libraries should set up with code blocks:

When we install code blocks then there is no library and header file of graphics are given by the developers with it, so we have to configure these things manually.I come across a lots of videos on youtube to configure graphics in codeblocks and i found all the videos are just waste of time except one video and i learnt  from that video .It was a bit difficult for me to configure graphics in codeblocks.
This is why because i was getting the libraries and header file with bug.
So i thought to create a video on this topic on my own  :How to use graphics in codeblocks video


  If you did these two things then you can use this program or concept to insert images in C++ language using graphics in Codeblocks.
Here we go:
 #include<iostream>  
 #include<graphics.h>  
 int main()  
 {  
   initwindow(600,400,"Images");  
   readimagefile("image_name.jpg",0,0,600,400);  
   getch();  
   readimagefile("image_name.jpg",0,0,600,400);  
   getch();  
   return 0;  
 }  


Description of the program:


If you are using code blocks to make programs in graphics mode then we can make the programs in only C++ because in the graphics.h header file there is reference to iostream and if we work in C language then it will not link and then we get error in header file graphics.h. Download File


here we have used the two important predefinded functions of graphics they are....

  • initwindow():this function is used to initialise a new window or you can say a  new window
  • readimagefile():this is the function that is used to set images in our program.
readimagefile() takes five parameters the first parameter is the name of the image with extension of the image and the rest are the co-ordinates of the screen where to set.


Thanks for visiting ...we will come with new typical programs so stay connected.


How to insert image in c language in turboc IDE

Its been very interesting as well as difficult to work with graphics in c or c++ languages.
But it will be more interesting to work with image insertion in C or C++ language.

I have already created the post to insert image in c/c++ in codeblocks IDE but now its time to achieve this using Turbo C++ IDE.

 Befor writing code we have to take care of  these points.
  • Create a  bmp(16 color Bitmap) image file using paint or any other image editor. 
  • paste that file into bin folder of turbo c where this program will be saved.
  • After pasting we will continue to write the below code.


 #include <alloc.h>  
   #include <conio.h>  
   #include <graphics.h>  
   #include <stdio.h>  
   #include <stdlib.h>  
   struct BMP  
   {  
    char Type[2];      //File type. Set to "BM".  
    unsigned long Size;   //Size in BYTES of the file.  
    unsigned long Reserved;   //Reserved. Set to zero.  
    unsigned long OffSet;  //Offset to the data.  
    unsigned long headsize; //Size of rest of header. Set to 40.  
    unsigned long Width;   //Width of bitmap in pixels.  
    unsigned long Height;   // Height of bitmap in pixels.  
    unsigned int Planes;  //Number of Planes. Set to 1.  
    unsigned int BitsPerPixel;    //Number of Bits per pixels.  
    unsigned long Compression;  //Compression. Usually set to 0.  
    unsigned long SizeImage; //Size in bytes of the bitmap.  
    unsigned long XPixelsPreMeter;   //Horizontal pixels per meter.  
    unsigned long YPixelsPreMeter;   //Vertical pixels per meter.  
    unsigned long ColorsUsed;  //Number of colors used.  
    unsigned long ColorsImportant; //Number of "important" colors.  
   };  
   int ShowBMP(int x, int y, char* FileName)  
   {  
     int b,a;  
     struct BMP Obj;  
     unsigned char* Datas;  
     int in=0;  
     unsigned char c=0;  
     FILE * fp;  
     fp = fopen(image.bmp,"rb"); //give filename of image with extension.  
     if(!fp){  
     printf("Error : Unable to open file ..");  
     exit(0);  
     }  
     fread(&Obj, sizeof(Obj), 1, fp);  
     if(Obj.BitsPerPixel!=4) // This isn't a 16 color bmp we can read;  
     {  
      fclose(fp);  
      printf("Error : File format not supported ..");  
      exit(0);  
     };  
     fseek(fp,Obj.OffSet,SEEK_SET);  
     Datas=(unsigned char*) calloc(Obj.Width/2+1, sizeof(unsigned char));  
     for(b=Obj.Height;b>=0;b--)  
     {  
      fread(Datas, sizeof(unsigned char), Obj.Width/2, fp);  
      c=0;  
      in=0;  
      for(a=0;a<=Obj.Width;a+=2)  
      {  
        c = (Datas[in] | 0x00) >>4;  
        putpixel(a+x,b+y,c);  
        c = (Datas[in] | 0xF0) & 0x0F;  
         putpixel(a+1+x,b+y,c);  
        in++;  
      }  
     }  
     free (Datas);  
     fclose(fp);  
     return 1;  
   }  
   void main()  
   {  
   int color;  
   int gd , gm ;  
   gd = VGA ; gm = VGAHI;  
   initgraph(&gd,&gm,"");  
   ShowBMP(0,0,"j.bmp"); /* Enter File Name Here */  
   getch();  
   closegraph();  
   }  

Now Run the code and you will get your image as output.


Thursday 29 November 2018

AI helps in detecting water leackage

Scientists have developed an artificial intelligence (AI) technology that can detect even small leaks in pipes, and could potentially help municipal systems significantly reduce water losses.

The system designed by researchers at the University of Waterloo in Canada combines sophisticated signal processing techniques and AI software to identify telltale signs of leaks carried via sound in water pipes.

The acoustic signatures are recorded by hydrophone sensors that can be easily and inexpensively installed in existing fire hydrants without excavation or taking them out of service.

"This would allow cities to use their resources for maintenance and repairs much more effectively. They could be more proactive as opposed to reactive," said Roya Cody, a PhD candidate at Waterloo.

"Major problems such as burst pipes are revealed by pressure changes, volume fluctuations or water simply bubbling to the surface, but small leaks often go undetected for years," said Cody.

In addition to the economic costs of wasting treated water, chronic leaks can create health hazards, do damage to the foundations of structures and deteriorate over time.

"By catching small leaks early, we can prevent costly, destructive bursts later on," said Cody.

Researchers are now doing field tests with the hydrant sensors after reliably detecting leaks as small as 17 litres a minute in the lab.

They are also working on ways to pinpoint the location of leaks, which would allow municipalities to identify, prioritise and carry out repairs.

"Right now they react to situations by sending workers out when there is flooding or to inspect a particular pipe if it's due to be checked because of its age," Cody said.

The sensor technology works by pre-processing acoustic data using advanced signal processing techniques to highlight components associated with leaks.

That makes it possible for machine learning algorithms to identify leaks by distinguishing their signs from the many other sources of noise in a water distribution system.

Tuesday 27 November 2018

Concept of Threads in Computer Programming:

Basically Thread is concept of System's OS, That is now being implemented by programmers in various places of application development and testing.

What is a Thread?

In computer science, a thread of execution is the smallest sequence of programmed instructions that can be managed independently by a scheduler, which is typically a part of the operating system. Multiple threads can exist within one process, executing concurrently and sharing resources such as memory, while different processes do not share these resources.
img
 A process with two threads of execution, 
running on one processor
  

What is a Process?

A process is the instance of a computer program that is being executed. It contains the program code and its activity. Depending on the operating system (OS), a process may be made up of multiple threads of execution that execute instructions concurrently.

A computer program is a passive collection of instructions, a process is the actual execution of those instructions. Several processes may be associated with the same program; for example, opening up several instances of the same program often results in more than one process being executed.  

Threads vs. processes

Threads differ from traditional multitasking operating system processes in that:
  • processes are typically independent, while threads exist as subsets of a process
  • processes carry considerably more state information than threads, whereas multiple threads within a process share process state as well as memory and other resources.
  • processes have separate address spaces, whereas threads share their address space
  • context switching between threads in the same process is typically faster than context switching between processes.

 Threads in Single Processor  and  Multiprocessor Systems:

Systems with a single processor generally implement multithreading by time slicing: the central processing unit (CPU) switches between different software threads. This context switching generally happens very often and rapidly enough that users perceive the threads or tasks as running in parallel. 
While On a multiprocessor or multi-core system, multiple threads can execute in parallel, with every processor or core executing a separate thread simultaneously; on a processor or core.
The process schedulers of many modern operating systems directly support both time-sliced and multiprocessor threading, and the operating system kernel allows programmers to manipulate threads by exposing required functionality through the system-call interface.

Time Slicing:

The period of time for which a process is allowed to run in a preemptive multitasking system is generally called the time slice or quantum. The scheduler is run once every time slice to choose the next process to run. The length of each time slice can be critical to balancing system performance vs process responsiveness - if the time slice is too short then the scheduler will consume too much processing time, but if the time slice is too long, processes will take longer to respond to input.  
An interrupt is scheduled to allow the operating system kernel to switch between processes when their time slices expire, effectively allowing the processor’s time to be shared between a number of tasks, giving the illusion that it is dealing with these tasks in parallel (simultaneously). The operating system which controls such a design is called a multi-tasking system

Multitasking System:

Multitasking is a method used by system's  OS to allow multiple processes to share processors (CPUs) and other system resources. Each CPU (core) executes a single task at a time. However, multitasking allows each processor to switch between tasks that are being executed without having to wait for each task to finish.

Single-Threading and Multi-Threading:

Single Threading:  

single-threading is the processing of one command at a time. The opposite of single-threading is multi-threading

Multi-Threading:

Multi-threading is mainly found in multitasking operating systems. Multi-threading is a widespread programming and execution model that allows multiple threads to exist within the context of one process. These threads share the process's resources, but are able to execute independently. The threaded programming model provides developers with a useful abstraction of concurrent execution. Multi-threading can also be applied to one process to enable parallel execution on a multiprocessing system. 

Multi-threaded applications have the following advantages:
  • Responsiveness: multi-threading can allow an application to remain responsive to input. In a one-thread program, if the main execution thread blocks on a long-running task, the entire application can appear to freeze. By moving such long-running tasks to a worker thread that runs concurrently with the main execution thread, it is possible for the application to remain responsive to user input while executing tasks in the background. On the other hand, in most cases multi-threading is not the only way to keep a program responsive, with non-blocking I/O and/or Unix signals being available for gaining similar results.[6]
  • Faster execution: this advantage of a multi-threaded program allows it to operate faster on computer systems that have multiple central processing units (CPUs) or one or more multi-core processors, or across a cluster of machines, because the threads of the program naturally lend themselves to parallel execution, assuming sufficient independence (that they do not need to wait for each other).
  • Lower resource consumption: using threads, an application can serve multiple clients concurrently using fewer resources than it would need when using multiple process copies of itself. For example, the Apache HTTP server uses thread pools: a pool of listener threads for listening to incoming requests, and a pool of server threads for processing those requests.
  • Better system utilization: as an example, a file system using multiple threads can achieve higher throughput and lower latency since data in a faster medium (such as cache memory) can be retrieved by one thread while another thread retrieves data from a slower medium (such as external storage) with neither thread waiting for the other to finish.
  • Simplified sharing and communication: unlike processes, which require a message passing or shared memory mechanism to perform inter-process communication (IPC), threads can communicate through data, code and files they already share.
  • Parallelization: applications looking to use multicore or multi-CPU systems can use multithreading to split data and tasks into parallel subtasks and let the underlying architecture manage how the threads run, either concurrently on one core or in parallel on multiple cores. GPU computing environments like CUDA and OpenCL use the multithreading model where dozens to hundreds of threads run in parallel across data on a large number of cores.
Multi-threading has the following drawbacks:
  • Synchronization: since threads share the same address space, the programmer must be careful to avoid race conditions and other non-intuitive behaviors. In order for data to be correctly manipulated, threads will often need to rendezvous in time in order to process the data in the correct order. Threads may also require mutually exclusive operations (often implemented using mutexes) in order to prevent common data from being simultaneously modified or read while in the process of being modified. Careless use of such primitives can lead to deadlocks, livelocks or races over resources.
  • Thread crashes a process: an illegal operation performed by a thread crashes the entire process; therefore, one misbehaving thread can disrupt the processing of all the other threads in the application.

Confusing Terms:

Multi-processing: Multiple processes runs in parallel.
Multi-threading: Multiple Threads runs in parallel.
Multitasking can achieved by multi-processing and multi-threading.


Above paragraph explains the concept of Threads And How an OS manages to provide multitasking and runs multiple applications in parallel. Further, We will See Threads in Java in next post:

Monday 12 November 2018

Increase internet speed using 1.1.1.1 DNS resolver app for iOS and Android

Cloudflare announced 1.1.1.1, the fastest public DNS resolver in the world earlier this year. Now, they have launched the 1.1.1.1 mobile app to make it easy to use 1.1.1.1 on your phone.

Steps to follow: 


1.1.1.1 features:
  • Greater privacy: By using a secure connection, 1.1.1.1 makes sure no one can snoop your DNS queries.
    Some ISPs use DNS queries to sell your data. Cloudflare will never sell your data or use it to target ads. Period.
  • Fastest way to experience the Internet: 1.1.1.1 makes the Internet faster by using Cloudflare’s global network.
    On average, we are 28% faster than the next fastest public resolver.
  • Easy to use: One-touch setup to make your Internet more safe and private. Install it today, get faster Internet, it’s that simple.
Download the app here for Android and here for iOS devices.

Sunday 11 November 2018

Start Learning AI

Introduction To Artificial Intelligence 

Artificial Intelligence is a way of making a computer, a computer-controlled robot, or a software think intelligently, in the similar manner the intelligent humans think.

Applications  of AI:
AI can be implemented in various fields, such as in a self driving car, Cancer Prediction, Robot as Lecturer  etc.

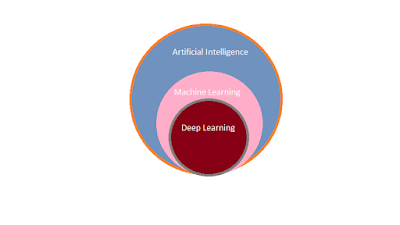
Two Subsets of AI:

AI subsets
Artificial Intelligence


  1. Machine Learning 
  2. Deep Learning

  1. Machine Learning  :

    Machine Learning is a subset of Artificial Intelligence.
    ML systems learn how to combine input to produce useful predictions on never-before-seen data.
    In Machine Learning , We train a model using a large set of labeled data, later on this model is used to test a set of test data i.e unlabeled data. Then accuracy is calculated that how accurate  the prediction is.

    Suppose that we need an AI to check whether this object is dog or not, then we provide various sets of  sample inputs during the training of our model.
    inputs consist of feature and label
     Dog can be identified by the way they: speak, run, height, eyes, tail etc.
    Here label is DOG and Features are sound, speed, height, and eye.

    When we say labeled data it means that a large data set  that contains Feature and Label.
    So ML moves around mainly three terminologies:
     (i) Label  (ii) Feature (iii) Model

    (i) Label:

    A label is the thing we're predicting—the y variable in simple linear regression. The label could be the future price of wheat, the kind of animal shown in a picture, the meaning of an audio clip, or just about anything.  
     

    (ii) Feature:

    A feature is an input variable—the x variable in simple linear regression. A simple machine learning project might use a single feature, while a more sophisticated machine learning project could use millions of features, specified as:  x1, x2, ...., xn
     Feature could be a property possessed by that thing which is useful to identify that thing uniquely/partially.

    (iii) Model: 

    A model defines the relationship between features and label.

    • Training means creating or learning the model. That is, you show the model labeled examples and enable the model to gradually learn the relationships

      between features and label.
    • Inference means applying the trained model to unlabeled examples. That is, you use the trained model to make useful predictions (y'). 

     Labeled Example:  

    This example is an instance of training data. 
    {x, y} or      {Feature, Label}  

    In order to train our model, we fed a large set of such instances with features and labels. 

    Unlabeled Example:

    This example is an instance of testing data. 
    {x, ?}  or   {Feature, ?}
    Finally we get a trained model that takes the unlabeled test data and make predictions for each test data. 

    "Regression vs. classification"

    A regression model predicts continuous values. For example, regression models make predictions that answer questions like the following:
    • What is the value of a house in California?
    • What is the probability that a user will click on this ad?

    A classification model predicts discrete values. For example, classification models make    predictions that answer questions like the following:
    • Is a given email message spam or not spam?
    • Is this an image of a dog, a cat, or a hamster?   
       
      Model can learn using two approaches: Supervised Learning and Unsupervised Learning.

      " In supervised learning model is being trained under the supervision of input labeled data.But in unsupervised learning no hint is provided during the training of model. Model learns by its own."


      "Machine Learning changes the way you think about a problem. The focus shifts from a mathematical science to a natural science, running experiments and using statistics, not logic, to analyse its results." - Peter Norvig - Google Research Director


Friday 9 November 2018

Private Facebook messages are being sold on the internet

  • People's private Facebook messages are being sold on the internet for anyone to read.
  • Tens of thousands of people's secret chats are being traded without their knowledge, according to a BBC report.
  • In all, at least 81,000 people's messages are being swapped online, the report claimed. Many of them came from Ukraine and Russia, but many more besides were from users in the UK, the US, Brazil and elsewhere.
Lock your profile down
Compromised accounts that were caught up in the hack are being sold for just $0.10 each, according to the report.
The leak does not appear to have come from Facebook itself, despite a series of data scandals. Instead, it appears to have been the consequence of malicious browser extensions, which install themselves onto people's computers and are then able to watch their activity and break into their account.
The hackers claimed to have access to 120 million accounts, but they appear to have been exaggeration the scale of the attack. However, the hackers showed some evidence of having the messages of some 81,000 people, a number of which were checked with account holders and confirmed to be genuine.
Facebook said it had contacted browser companies to ensure that the malicious extensions were no longer used. But it advised its users to check the extensions they have installed and remove any that might be malicious.
“Based on our investigation so far, we believe this information was obtained through malicious browser extensions installed off of Facebook,” Guy Rosen, Facebook's vice president of product management, said in a statement emailed to a number of outlets.
“We have contacted browser makers to ensure that known malicious extensions are no longer available to download in their stores and to share information that could help identify additional extensions that may be related,” Rosen said. “We have also contacted law enforcement and have worked with local authorities to remove the website that displayed information from Facebook accounts.”
“We encourage people to check the browser extensions they’ve installed and remove any that they don’t fully trust. As we continue to investigate, we will take action to secure people’s accounts as appropriate.”

Artificial intelligence technique can boost brain scans to predict Alzheimer early - details inside

The results showed that the algorithm was able to teach itself metabolic patterns that corresponded to Alzheimer's disease.

Artificial intelligence (AI) can help improve the ability of brain imaging techniques to predict Alzheimer's disease early, according to a study. Researchers from the University of California in San Francisco (UCSF) trained a deep learning algorithm on a special imaging technology known as 18-F-fluorodeoxyglucose positron emission tomography (FDG-PET).

They included more than 2,100 FDG-PET brain images from 1,002 patients and on an independent set of 40 imaging exams from 40 patients. The results showed that the algorithm was able to teach itself metabolic patterns that corresponded to Alzheimer's disease.

It also achieved 100 per cent sensitivity at detecting the disease an average of more than six years prior to the final diagnosis. "We were very pleased with the algorithm's performance. It was able to predict every single case that advanced to Alzheimer's disease," said Jae Ho Sohn, from UCSF's Radiology and Biomedical Imaging Department.

"If FDG-PET with AI can predict Alzheimer's disease this early, beta-amyloid plaque and tau protein PET imaging can possibly add another dimension of important predictive power," he added, in the paper detailed in the journal Radiology. While early diagnosis of Alzheimer's is extremely important for the treatment, it has proven to be challenging.

Although the cause behind the progressive brain disorder remains unconfimed yet, various research has linked the disease process to changes in metabolism, as shown by glucose uptake in certain regions of the brain.  These changes can be difficult to recognise.

"If we diagnose Alzheimer's disease when all the symptoms have manifested, the brain volume loss is so significant that it's too late to intervene," Sohn said.  "If we can detect it earlier, that's an opportunity for investigators to potentially find better ways to slow down or even halt the disease process," he noted.

Sohn explained that the algorithm could be a useful tool to complement the work of radiologists - especially in conjunction with other biochemical and imaging tests - in providing an opportunity for early therapeutic intervention.

Tuesday 6 November 2018

Picasso Android Tutorial – Android Picasso Image Loader Library

Hello programmers, today we will be learning about picasso library for image downloading developed by sqaure.
  • Picasso one of the most popular library for image downloading.
  • It makes our wok very simple so its powerful library for image downloading.
  • It uses caching technique.
  • I have already published a post on Glide(similar to picasso) Image Downloading library for android.


Why Picasso library?

Its obvious that you will think why we should use picasso library.
If we use the traditional method of downloading the image from a url then we need to manage a lots of thing.
 And of course lines of code and development time will also increase.
 But if we will use a 3rd party library like picasso then we will achieve our goal in few lines of code.  So if we will not use a 3rd party library then  we would need
  1. Very large amount of code to be written
  2. We have to write another logic to implement caching.
  3. Caching is very important to make the application faster.
  4. We also have to deal with memory while writing the code.
  5. If any error occurs we need to handle that also.
  6. we will not focusing more on the application feature that is going to be developed. 
So, picasso will handle these all by default and overcome these all problems.

Adding Picasso Library to our Android Project

Adding picasso android library to your project is very easy.
Add the following line in the dependency block of your build.gradle file(app /module level).
I am assuming that you are using Android Studio.
After adding it just sync your project.

Loading Image from URL by Using Picasso Android Library

Loading image from URL by using Picasso Android Library is very simple and easy. The first thing we would need is an ImageView

Code for Loading Image with Picasso

It is very simple. We have to use the Picasso class.

 Picasso.get()  
 .load(IMAGE_URL)  
 .into(imageView);  


Placeholder and Error Handling

  • Because we are loading the image from internet.
  • the process would take some time depending on the internet speed. 
  • So it would be a good idea to display a image from the device while the image from URL is getting loaded.
  • One more situation could be when the image is not downloaded from the URL (when the URL given is wrong). 
  • In this case we should display an error image.
  • Both these things can be done very easily by using picasso.
  • See the following code snippet.

  Picasso.get()
   .load("YOUR IMAGE URL HERE")  
   .placeholder(Your Drawable Resource) // optional the image to display while the url image is downloading  
   .error(Your Drawable Resource) //this is also optional if some error has occurred in downloading the image                                  //this image would be displayed  
   .into(imageView);  

Re-sizing and Rotating

We can also resize and rotate the image very easily.


 Picasso.with(this)  
    .load("YOUR IMAGE URL HERE")      
    .placeholder(DRAWABLE RESOURCE)  // optional      
    .error(DRAWABLE RESOURCE)   // optional      
    .resize(width, height)            // optional      
    .rotate(degree)               // optional      
    .into(imageView);  


Using Picasso Android Library in Our Project

Now lets try the above codes in our Android Studio Project. So I will be creating a new Android Project.

  • Open Android Studio and create a new project.
  • I have created PicassoExample. 
  • First we have to add the Picasso Library. 
  • So open your build.gradle(app level) and add the following line inside dependency block and sync your project.
  • As we will load the image from a URL so we will also need internet permission. 
  • So open AndroidManifest.xml and add internet permission.
 <?xml version="1.0" encoding="utf-8"?>  
 <RelativeLayout xmlns:android="http://schemas.android.com/apk/res/android"  
   xmlns:app="http://schemas.android.com/apk/res-auto"  
   xmlns:tools="http://schemas.android.com/tools"  
   android:layout_width="match_parent"  
   android:orientation="vertical"  
   android:layout_height="match_parent"  
   tools:context=".MainActivity">  
   <ImageView  
     android:layout_width="wrap_content"  
     android:layout_height="wrap_content"  
     android:layout_centerInParent="true"  
     android:src="@mipmap/ic_launcher_round"  
     android:id="@+id/imageView"  
     />  
   <Button  
     android:layout_width="match_parent"  
     android:id="@+id/btn"  
     android:layout_below="@+id/imageView"  
     android:layout_centerHorizontal="true"  
     android:text="show image"  
     android:layout_margin="10dp"  
     android:layout_height="wrap_content" />  
 </RelativeLayout>  


  • Now come inside MainActivity.java and define your ImageView and a button.

MainActivity.java 

 package protector.video.com.picasoexample;  
 import android.os.Bundle;  
 import android.support.v7.app.AppCompatActivity;  
 import android.view.View;  
 import android.widget.Button;  
 import android.widget.ImageView;  
 import com.squareup.picasso.Picasso;  
 public class MainActivity extends AppCompatActivity {  
   private ImageView imageView;  
   @Override  
   protected void onCreate(Bundle savedInstanceState) {  
     super.onCreate(savedInstanceState);  
     setContentView(R.layout.activity_main);  
     Button btn=findViewById(R.id.btn);  
     imageView=findViewById(R.id.imageView);  
     //setting click listener to the button
     btn.setOnClickListener(new View.OnClickListener() {  
       @Override  
       public void onClick(View v) {  
         Picasso.get()  
             .load("https://avatars0.githubusercontent.com/u/1?v=4")  
             .placeholder(R.drawable.ic_image_black_24dp) // optional the image to display while the url image is downloading  
             .error(R.drawable.ic_error_black_24dp) //this is also optional if some error has occurred in downloading the image                 //this image would be displayed  
             .into(imageView);  
       }  
     });  
   }  
 }  
  • We need two images one for placeholder and one for error. I will be using the following images. Just save these and paste inside the drawable folder of your project.
  • Now we need a URL to an ImageFile. I have this URL https://avatars0.githubusercontent.com/u/1?v=4


Finally run your application. 
Picasso Android 
Happy coding......
Thank You

Monday 5 November 2018

Glide - Image Download library for android

What is Glide?

  • Glide is an open source media management framework for Android.
  • Control media decoding, memory and disk caching, and resource pooling into a simple and easy to use interface
  • Glide supports fetching, decoding, and displaying video stills, images, and animated GIFs.
  • Glide includes a flexible API that allows developers to plug in to almost any network stack 
  • Glide’s primary focus is on making scrolling any kind of a list of images as smooth and fast as possible, but Glide is also effective for almost any case where you need to fetch, resize, and display a remote image.

Glide Unique Features

  1. Animated GIF decoding : you can load GIF animation into ImageView.
  2. Supports Thumbnail
  3. Supports OkHttp and Volley library & retrofilt library
  4. Placeholder can be added before loading the original image.
  5. Any custom image can be shown if error occurs while loading the original image.

Alternatives of Glide 

  •  Picasso  

Why Image loader library? 

  • To show an image into ImageView from a url we need to download that image
  • downloading the complete image from remote location, handle network errors if occurs while downloading. 
  • Implement image caching.
To download an image one should do a lot of things.
This will increase the lines of code and of course development time.
So its better to use the library to reduce our work and focus more on the development idea.

Steps to use Glide?

step 1.

 Add dependency for Glide into app/build.gradle.
dependencies {

implementation 'com.github.bumptech.glide:glide:4.8.0
} 

Step 2.

 Add INTERNET permission in manifest file 

 <uses-permission android:name="android.permission.INTERNET" /> 

Step 3

 Add ImageView in you layout

Declare an ImageView in your layout to display image from remote server in it
 <ImageView  
   android:layout_width="wrap_content"  
   android:layout_height="wrap_content"  
   android:id="@+id/imageView">  
 </ImageView>

Step 4 

 Add ImageView in you layout


 Glide.with(this)  
     .load("IMAGE URL HERE")  
     .placeholder(R.drawable.placeholder)  
     .error(R.drawable.imagenotfound)  
     .into(imageView);


MainActivity.java

 public class MainActivity extends AppCompatActivity {  
   @Override  
   protected void onCreate(Bundle savedInstanceState) {  
     super.onCreate(savedInstanceState);  
     setContentView(R.layout.activity_main);  
     final String url="https://avatars0.githubusercontent.com/u/1?v=4";  
     //Glide  
     Button btn=findViewById(R.id.btn);  
     final ImageView imageView=findViewById(R.id.img);  
     btn.setOnClickListener(new View.OnClickListener() {  
       @Override  
       public void onClick(View v) {  
         Glide.with(MainActivity.this).load(url).into(imageView);  
       }  
     });  
   }  
 }  

activity_main.xml

 <?xml version="1.0" encoding="utf-8"?>  
 <LinearLayout xmlns:android="http://schemas.android.com/apk/res/android"  
   xmlns:app="http://schemas.android.com/apk/res-auto"  
   xmlns:tools="http://schemas.android.com/tools"  
   android:layout_width="match_parent"  
   android:orientation="vertical"  
   android:layout_height="match_parent"  
   tools:context=".MainActivity">  
   <ImageView  
     android:layout_width="wrap_content"  
     android:id="@+id/img"  
     android:src="@mipmap/ic_launcher"  
     android:layout_height="wrap_content" />  
   <Button  
     android:layout_width="wrap_content"  
     android:text="Download image and show"  
     android:id="@+id/btn"  
     android:layout_height="wrap_content" />  
 </LinearLayout>  

How to implement Facebook audience network banner ad in android app using Android Studio

Its very simple to implement Facebook audience network banner ad in android app using Android Studio. We will complete it in 4 Steps. 1. ...